markdown
Xdebug 3 已經正式釋出, 不僅在效能上提升, 在設定上也變得簡單許多。
今天來介紹如何在 VSCode 上使用 XDebug 來偵錯 PHP 程式。
### 環境
- Windows 10
- VSCode v1.52.0
- PHP v7.4.12
- XDebug v3.0.0
PHP 在本機上的環境變數設定,請參考 [如何整合設定 PHP 的開發環境至 Visual Studio Code](https://devmanna.blogspot.com/2019/01/vs-code-php-environment-intergration-settings.html)
### PHP 加上 Xdebug
下載 [PHP XDebug](https://xdebug.org/download#releases),請務必下載對應 PHP 的版本
`php.ini` 設定檔需加上 XDebug 的設定來開啟 debug 模式
zend_extension 請設定您的 PHP XDebug 的檔案位置
```
[xdebug]
zend_extension="D:\_devlib\php\xdebug\php_xdebug-3.0.0-7.4-vc15-x86_64.dll"
xdebug.mode=debug
xdebug.start_with_request=yes
; xdebug 3 版 port 預設為 9003, 若想維持與 2 版一樣的 9000 port 則可變更 client_port 的值
;xdebug.client_port = 9000
```
XDebug v3 的設定是不是精簡許多?
確認 PHP 是否正確掛載 XDebug 的 extension
```
$ php -v
```
顯示應會如下 (必須出現 with Xdebug ...)
```
PHP 7.4.12 (cli) (built: Oct 27 2020 17:18:47) ( ZTS Visual C++ 2017 x64 )
Copyright (c) The PHP Group
Zend Engine v3.4.0, Copyright (c) Zend Technologies
with Xdebug v3.0.0, Copyright (c) 2002-2020, by Derick Rethans
```
### 安裝 VSCode 的 PHP Debug 套件
- [PHP Debug](https://marketplace.visualstudio.com/items?itemName=felixfbecker.php-debug) by Felix Becker
或者是安裝 [PHP Productive Pack](http://bit.ly/2xSEkwZ) 套件包增加生產力
### VSCode 的偵錯設定
在 VSCode 開啟 PHP 專案,點 "執行" 選擇 "新增組態",選擇 "PHP"
即會自動產生對應程式語言的偵錯設定檔 `.vscode/launch.json`
由於目前使用 XDebug 的版本是 v3.0.0,預設的 port 要改成 `9003` 才行
```json
{
"version": "0.2.0",
"configurations": [
{
"name": "Listen for XDebug",
"type": "php",
"request": "launch",
"port": 9003
},
{
"name": "Launch currently open script",
"type": "php",
"request": "launch",
"program": "${file}",
"cwd": "${fileDirname}",
"port": 9003
}
]
}
```
### 執行偵錯
下圖為一個簡單的 PHP 檔案,前面有紅點為指定偵錯的中斷點
1. 先在程式加上偵錯中斷點
2. 執行偵錯
- Listen for XDebug (偵錯監聽中,需在終端機或網站執行到此行程式才會觸發偵錯)
- Lunch currently open script (即會在 focus 的 PHP 程式啟動偵錯)
3. 偵錯步驟 (繼續/不進入函式/逐步執行/跳離函式/重新啟動/停止)
在偵錯的面板上即可看到偵錯的訊息
例如此例在程式跳到第 5 行時, $x 的變數值為 "VSCode + PHP Debug mode!"
偵錯 PHP 就是這麼簡單!
2020/12/13
2020/10/24
[Composer] v2.0 已釋出! 來更新至最新的 Composer 2.0 版本吧!
markdown
2020-10-24 Composer 2.0 正式釋出!
### 關於 Composer 2.0 新功能
- 改善效能 50% 以上 (這個很需要啊)
- 架構變更及確定性:vendor 更新不受網路錯誤干擾
- Runtime 特徵 (可在 composer.json 設定 `"composer-runtime-api": "^2.0"`)
- 錯誤訊息改善
- 暫時限制部分更新 (`composer update vendor/package:1.0.*`)
### 如何更新至 Composer 2.0
Composer 2.0 基本上可以順利快速升級
- 2.0 版本仍支援 PHP 5.3 以上版本
- composer.lock 檔案可在版本間互相操作,可更新至 2.0 版本或是回復
- 大多數的命令在 2.0 保持一致
若原先使用 Composer 1.x 版本,執行 `composer self-update` 則會更新 1.x 的主要穩定版本
更新至 2.0 只要執行以下命令
```
composer self-update --2
```
若隨時要變更至 1.x 版本,則執行
```
composer self-update --1
```
### 向下相容問題
- plugings: 需要更新支援 Composer 2
- 避免相容性錯誤,可在部署至 production 時執行 `composer check-platform-reqs --no-dev`
- Repository 優先性:若套件存在於較高優先的儲存庫,即會完全忽略較低優先性的儲存庫
- 無效的 PSR-0 / PSR-4 設定將不自動載入 optimized-autoloader 模式
### 未來如何
根據發佈消息,Composer 2.1 應該還是會支援 PHP 5.3,但 Composer 2.2 就會要求要 PHP 7.1.3 以上版本。
### References
- [Composer 2.0 is now available!](https://blog.packagist.com/composer-2-0-is-now-available/)
- [Upgrade guides for Composer 1.x to 2.0](https://getcomposer.org/upgrade/UPGRADE-2.0.md)
2020/09/05
[Laravel] Laravel 8 搶先玩
markdown
Laravel 8 即將在 September 8, 2020 釋出!
今天就搶先來玩一下囉~
#### 更新 Laravel Installer
先來把 Laravel Installer 更新到最新版本 4.0.0
### 方法 1: 直接修改本機全域的 `composer.json`
把 `laravel/installer` 的版本改成 "^4.0"
```json
{
"require": {
...
"laravel/installer": "^4.0"
}
}
```
再執行全域更新
```
composer global update
```
### 法方 2: 移除再重裝 Laravel Installer
先移除
```
composer global remove laravel/installer
```
再安裝最新版本
```
composer global require laravel/installer
```
確認版本是否為新版
```
laravel -v
```
#### Laravel 8
我們來用剛剛新裝的 Laravel Installer 來建立 Laravel 8 專案吧!
因為目前還沒正式 Release, 所以先來裝 dev 版本
暫時先把專案名稱命名為 lv8-dev
```
laravel new lv8-dev --dev
```
新版本安裝畫面變得不一樣囉~ 有 Laravel 圖文字樣煥然一新!
再來看一下 Laravel 8 的新呈現畫面 (本範例使用 Valet 開發環境, 若以指令瀏覽結果,請輸入 `php artisan serve`)
2020/08/23
[macOS] Mac 解決 gyp: No Xcode or CLT version detected! 的問題
markdown
### 環境
- macOS Catalina 版本 10.15.6
- Node v14.5.0
- npm v6.14.5
### 問題
最近換新電腦,在開新專案執行 npm install 時出現下列訊息
```
No receipt for 'com.apple.pkg.CLTools_Executables' found at '/'.
No receipt for 'com.apple.pkg.DeveloperToolsCLILeo' found at '/'.
No receipt for 'com.apple.pkg.DeveloperToolsCLI' found at '/'.
gyp: No Xcode or CLT version detected!
gyp ERR! configure error
gyp ERR! stack Error: `gyp` failed with exit code: 1
```
### 解決方法
參考此文:[Installation notes for macOS Catalina (v10.15)](https://github.com/nodejs/node-gyp/blob/master/macOS_Catalina.md)
```
sudo rm -rf $(xcode-select -print-path)
```
執行過程它會重新安裝 command line tools
完成安裝後就行了
參考連結中還有其他指令,但我僅執行這行就成功了,若有朋友也遇到相同問題,可以參考接下來的動作
```
xcode-select --install
```
2020/08/05
[.NET Core] 如何移除不需要的 .NET Core SDK 版本
markdown
### 前言
開發環境日積月累,安裝了不少 SDK 版本,用不到也很佔空間,於是到了該清理的時候
目前我的機器存在的版本
### Environment
- Windows 10
### 安裝 dotnet-core-unistall 工具
- 下載 msi 檔案: https://github.com/dotnet/cli-lab/releases
- .NET Core Uninstall Tool 文件: https://aka.ms/dotnet-core-uninstall-docs
- DotNet Core Uninstall v1.1.122401
安裝完 .NET Core Uninstall Tool 後,開啟 PowerShell 切換到 `C:\Program Files (x86)\dotnet-core-uninstall` 目錄
```
cd "C:\Program Files (x86)\dotnet-core-uninstall"
```
列出可移除的 dotnet core 版本
```
.\dotnet-core-uninstall list
```
有被 Visual Studio 使用的版本也會標記出來,這部分我要保留版本號的資訊
#### dry-run / whatif
在實際移除前,可用 dry-run 或 whatif 來看一下執行後會移除的版本
```
.\dotnet-core-uninstall dry-run [option] [VERSION]
.\dotnet-core-uninstall whatif [option] [VERSION]
```
移除僅特定版本 SDK
移除除了指定版本外的 SDK
把 dry-run 或 whatif 改成 remove 則會真的執行移除動作 (PowerShell 需使用系統管理員身分執行)
因為我要移除掉 Visual Studio 有使用以外的版本所以列出要保留的版本號,並加上 `--all-but` 的選項
```
.\dotnet-core-uninstall remove --sdk --all-but 2.1.202 2.1.513 2.1.802 2.2.104
```
刪除版本之前,也會再詢問是否確定要移除,執行後就會列出一個個被移除的版本
清掉之後僅留下的 SDK 版本
重新釋放掉不少空間
### References
- [How to remove the .NET Core Runtime and SDK](https://docs.microsoft.com/zh-tw/dotnet/core/install/remove-runtime-sdk-versions?tabs=windows&pivots=os-windows&WT.mc_id=DOP-MVP-5002629)
- [.NET Core Uninstall Tool](https://docs.microsoft.com/zh-tw/dotnet/core/additional-tools/uninstall-tool?tabs=windows&WT.mc_id=DOP-MVP-5002629)
2020/06/15
[PHP] 解決執行 Composer 出現 PHP Fatal error: Allowed memory size exhausted 的問題
markdown
### 問題
今天在執行 composer require 套件安裝時出現 PHP Fatal error: Allowed memory size of xxx bytes exhausted 的錯誤訊息
### 解決方法
1. 在 `php.ini` 加大 `memory_limit` 或是設 `memory_limit = -1` (不限制)
2. 使用命令 `php -d memory_limit=-1 composer.phar`
### 參考連結
- [Composer trouble shooting: memory-limit-errors](https://getcomposer.org/doc/articles/troubleshooting.md#memory-limit-errors)
2020/06/14
[Laravel] 解決 Sqlite 在 migration 退版時發生不支援 dropColumn 或 renameColumn 多重呼叫的問題
markdown
### 問題
在 Laravel 使用 Sqlite 為資料庫使用, 執行 migration rollback 的時候發生下列錯誤訊息:
SQLite doesn't support multiple calls to dropColumn / renameColumn in a
single modification.
### 發生原因
在 migration 的 down() 方法裡使用多個 dropColumn 但 Sqlite 不支援
$table->dropColumn('field1');
$table->dropColumn('field2');$table->dropColumn([
'field1',
'field2',
]);2020/05/06
[CSS] 列印網頁強制換頁設定
markdown
### 換頁的 CSS 相關設定
```css
page-break-before: auto|always|avoid|left|right|initial|inherit;
page-break-after: auto|always|avoid|left|right|initial|inherit;
page-break-inside: auto|avoid|initial|inherit;
```
在標籤前或後換頁
```css
@media print {
/* 在標籤前換頁 */
h1 { page-break-before: always; }
/* 在標籤後換頁 */
footer { page-break-after: always; }
}
```
避免在文中換頁 `page-break-inside: avoid;`
```css
@media print {
/* 避免標籤內換頁 */
pre, blockquote { page-break-inside: avoid; }
}
```
### References
- https://www.w3schools.com/cssref/pr_print_pageba.asp
2020/04/10
[EF] 使用 SqlFunctions.DatePart 解決 DataTime 日期格式化問題
markdown
### 環境
- Entity Framework 6
### 問題
在 EF 要處理日期時間的特定格式,不能用 DateTime.ToString() 的方式來處理
例如:
```
var orders = context.Orders.Where(x => x.OrderDate.ToString("yyyy-MM").Equals("2020-04")).ToList();
```
執行會出現錯誤
```
System.NotSupportedException: LINQ to Entities does not recognize the method 'System.String ToString(System.String)' method, and this method cannot be translated into a store expression.
```
因為 ToString() 是 C# 程式語法, SQL 不認識它是正常的
### 解決方法
透用 [DbFunctions](https://docs.microsoft.com/en-us/dotnet/api/system.data.entity.dbfunctions?view=entity-framework-6.2.0&WT.mc_id=DOP-MVP-5002629) 或 [SqlFunctions](https://docs.microsoft.com/en-us/dotnet/api/system.data.entity.sqlserver.sqlfunctions?view=entity-framework-6.2.0&WT.mc_id=DOP-MVP-5002629) 來處理日期格式問題
以下是採用 SqlFunctions.DatePart() 來取得我要的日期部分
```
var orders = db.Orders.Where(x =>
SqlFunctions.DatePart("year", x.OrderDate) == 2020
&& SqlFunctions.DatePart("month", x.OrderDate) == 4
).ToList();
```
常用的 datepart 參數: `year`, `month`, `day`, `week`, `hour`, `minute`
詳細的 DatePart 可以查詢 [SQL 文件: DATEPART](https://docs.microsoft.com/zh-tw/sql/t-sql/functions/datepart-transact-sql?view=sql-server-ver15&WT.mc_id=DOP-MVP-5002629)
### 參考連結
- [DbFunctions](https://docs.microsoft.com/en-us/dotnet/api/system.data.entity.dbfunctions?view=entity-framework-6.2.0&WT.mc_id=DOP-MVP-5002629)
- [SqlFunctions](https://docs.microsoft.com/en-us/dotnet/api/system.data.entity.sqlserver.sqlfunctions?view=entity-framework-6.2.0&WT.mc_id=DOP-MVP-5002629)
- [SqlFunctions.DatePart Method](https://docs.microsoft.com/en-us/dotnet/api/system.data.entity.sqlserver.sqlfunctions.datepart?view=entity-framework-6.2.0&WT.mc_id=DOP-MVP-5002629)
- [SQL 文件 DATEPART](https://docs.microsoft.com/zh-tw/sql/t-sql/functions/datepart-transact-sql?view=sql-server-ver15&WT.mc_id=DOP-MVP-5002629)
- [Linq Convert DateTime? to DateTime in ("dd/MM/yyyy")](https://forums.asp.net/t/1854597.aspx)
- [EF DateTime格式化](https://xbuba.com/questions/51970339)
2020/03/31
[Vue] 如何轉換 jQuery 全域的 click 事件到 Vue 的相對處理方試
markdown
### 前言
採用 jQuery 引用 `$(document).click()` 的來監聽整份文件的點擊事件
文件內有其他子項目的點擊處理 `$('.myButton').click()`
那麼以 Vue 的相對處理方式為何? (範例為 Vue 2.x 版本)
### 監聽事件
在 mounted 加入 `document.addEventListener`, 事件為 `click`, callback 為在 Vue 的定義的 `onClick` 方法
```
document.addEventListener('click', this.onClick);
```
在 Vue 的使用如下
```js
new Vue({
...
methods: {
onClick() {},
buttonClick() {}
}
mounted() {
document.addEventListener('click', this.onClick);
},
beforeDestroy() {
document.removeEventListener('click', this.onClick);
},
...
});
```
注意在 HTML 的 Vue click 事件, 需要加上 `.stop` (它等同於 `event.stopPropagation()`)
這會防止觸發它以外的事件
```html
```
Vue 的 Event Modifiers 除了常用的 `.prevent` (等同於 `event.preventDefault()`) 及上面提及的 `.stop` 之外
還有 `.capture`, `.self`, `.once`, `.passive` 等事件修飾符
詳細文件可以參考 [Event Handling](https://vuejs.org/v2/guide/events.html)
### 參考連結
- [Vue.js + Call the click event for whole page document](https://stackoverflow.com/questions/41950432/vue-js-call-the-click-event-for-whole-page-document)
- [Vue.js: Methods 與事件處理 (Event Handling)](https://cythilya.github.io/2017/04/17/vue-methods-and-event-handling/)
- [Vue - Event Handling](https://vuejs.org/v2/guide/events.html)
2020/03/16
[TypeScript] 解決 TS2300: Duplicate identifier 'IteratorResult' 錯誤問題
markdown
今天在做 VS Code 套件編譯時出現以下錯誤訊息: `Duplicate identifier 'IteratorResult'`
有 2 個 *.d.ts 檔案定義相沖突
```
Starting compilation in watch mode...
../../../npm/node_modules/typescript/lib/lib.es2015.iterable.d.ts:41:6 - error TS2300: Duplicate identifier 'IteratorResult'.
41 type IteratorResult = IteratorYieldResult | IteratorReturnResult;
~~~~~~~~~~~~~~
node_modules/@types/node/index.d.ts:74:11
74 interface IteratorResult { }
~~~~~~~~~~~~~~
'IteratorResult' was also declared here.
node_modules/@types/node/index.d.ts:74:11 - error TS2300: Duplicate identifier 'IteratorResult'.
74 interface IteratorResult { }
~~~~~~~~~~~~~~
../../../npm/node_modules/typescript/lib/lib.es2015.iterable.d.ts:41:6
41 type IteratorResult = IteratorYieldResult | IteratorReturnResult;
~~~~~~~~~~~~~~
'IteratorResult' was also declared here.
Found 2 errors. Watching for file changes.
```
### 解決方法
在 `tsconfig.json` 的 `compilerOptions` 區塊加上以下設定, 再重新執行編譯
透過直接跳過 Library 的檢查, 因為它不在我程式碼的控制範圍內, 把它排除即可
```
"skipLibCheck": true,
```
2020/01/30
[.NET Core] 在本地使用 Try .NET
markdown
### 前言
微軟有個很棒的線上執行 .NET 程式的平台 Try .NET,可以到這裡試玩學習 [.NET In-Browser Tutorial](https://dotnet.microsoft.com/learn/dotnet/in-browser-tutorial/1)
而這個 Try .NET 我們也可以下載在本地端使用唷!自己創建 Sample Code 做為教育訓練用也不錯~
### 環境
- Windows 10
- .NET Core 3.1
### 本地使用 Try .NET
安裝文件 [Getting started with dotnet try](https://github.com/dotnet/try/blob/master/DotNetTryLocal.md)
首先需要 .NET Core 2.1 或 3.0 以上 SDK 版本,才能進行以下步驟
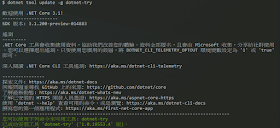
#### 安裝 dotnet-try 全域工具
```
dotnet tool update -g dotnet-try
```

#### 開始玩 samples 官方提供 3 種方式,本範例採用第一種最簡單的開始方式,直接使用工具的預設範例 先建立一個新的資料夾,切換至此資料夾位置輸入以下指令 ``` dotnet try demo ```
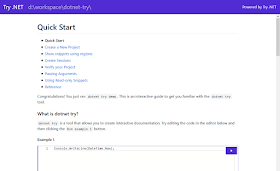
#### Try .NET demo project 開啟的專案畫面如下,裡面包含使用說明及教學
#### 常用指令 用來驗證執行的 sample code 是否能正確執行 ``` dotnet try verify ``` 有趣嗎?快載來玩玩吧! ### References: - [Try .NET](https://github.com/dotnet/try) - [Try .NET Samples](https://github.com/dotnet/try-samples)

#### 開始玩 samples 官方提供 3 種方式,本範例採用第一種最簡單的開始方式,直接使用工具的預設範例 先建立一個新的資料夾,切換至此資料夾位置輸入以下指令 ``` dotnet try demo ```

#### Try .NET demo project 開啟的專案畫面如下,裡面包含使用說明及教學

#### 常用指令 用來驗證執行的 sample code 是否能正確執行 ``` dotnet try verify ``` 有趣嗎?快載來玩玩吧! ### References: - [Try .NET](https://github.com/dotnet/try) - [Try .NET Samples](https://github.com/dotnet/try-samples)


